The RETINA Program was founded by scientists and engineers under the auspices of a unique educational program in which teams of undergraduate and graduate students work in interdisciplinary design teams in order to prototype high-risk technologies and systems in a low-cost way and to field these systems in order to perform high-quality, peer-reviewed science and technology validation missions (https://www.scu.edu/engineering/labs–research/labs/robotics-systems-lab/). A portion of this program is designed to motivate students by enabling them to solve real world problems with hands-on technologies through Project-Based Learning (PBL). Underwater remotely operated vehicles (ROV) meet the goals for a PBL program, because students of all ages can interact and be creative in the design and fabrication of simple robotic and sensor systems. We provide a series of ROVs and the directions to build them. They begin with basic systems that we use in second grade and end with small working vehicles for scientific and educational use.
ROVs – Remotely Operated Underwater Vehicles
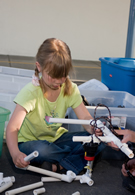
PVC ROV
This simple PVC ROV is suitable for younger students (second grade), introducing them to ROV engineering challenges. Students with minimal background information on the basic functions and features of ROVs can build a working unit using pre-cut PVC pipe segments, a variety of PVC connectors, foam for flotation, and a 3 thrusters system (connected to an operator control box).
For instructions on how to build these components, refer to: http://www.mbari.org/education/rov/default.html
A parts list is provided [ROV_Parts_List.xls]. We list vendors, but other vendors are possible. Note that part number and availability are subject to change.
 PVC Rovs |
 |
Camera ROV
To further engage older students (fourth grade and beyond) in hands-on ROV technology and related science concepts, we support an ROV kit with a camera that is available commercially (http://nventivity.com/ROVIAB.html). The vendors provide a step-by-step instruction booklet “ROV–in–a–Box Underwater Robot Project Kit” written by Karen Suhm and have deployed their ROVs to 100 ft in freshwater. In addition to the kit, you will need an additional 12-volt battery, a battery charger, and a battery-powered flat screen monitor (we use 7 or 9 inch screens).
We present a series of videos to help explain how to fabricate this ROV with the modifications that have worked for us:
- Building the ROV Frame (section 1 and 11)
- Propeller Assembly (section 2)
- Soldering Basics
- Wiring and Waterproofing the Thrusters (section 2)
- Waterproofing the Camera (section 3)
- Installing the Thrusters (section 5)
- Making the Tether (Umbilical) (section 6)
- Building the Control Box (section 7)
- Wiring the Control Box (section 8)
- The Finished ROV
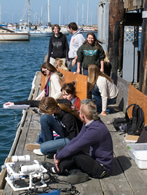 CSUMB Marine Bio Class, 2012 |
 ROV by Snorkel Steve, 2012 |
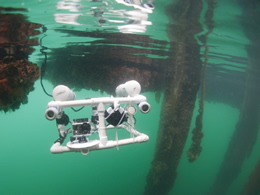
Catalina Joy-stick ROV
The joy-stick ROV was designed by Dr. Steve Moore (CSUMB) through a competitive award from C-DEBI educational call for proposals. This vehicle expands upon the capabilities of the Camera ROV by adding an additional thruster, making all four thrusters proportionally controlled with a single joy-stick, and modifying a Go-Pro camera that provides a direct feed to the end of the tether, thus eliminating the standard camera used with the Camera ROV. This vehicle is much more versatile and stable, providing a superior video for observation and classroom activities.
